

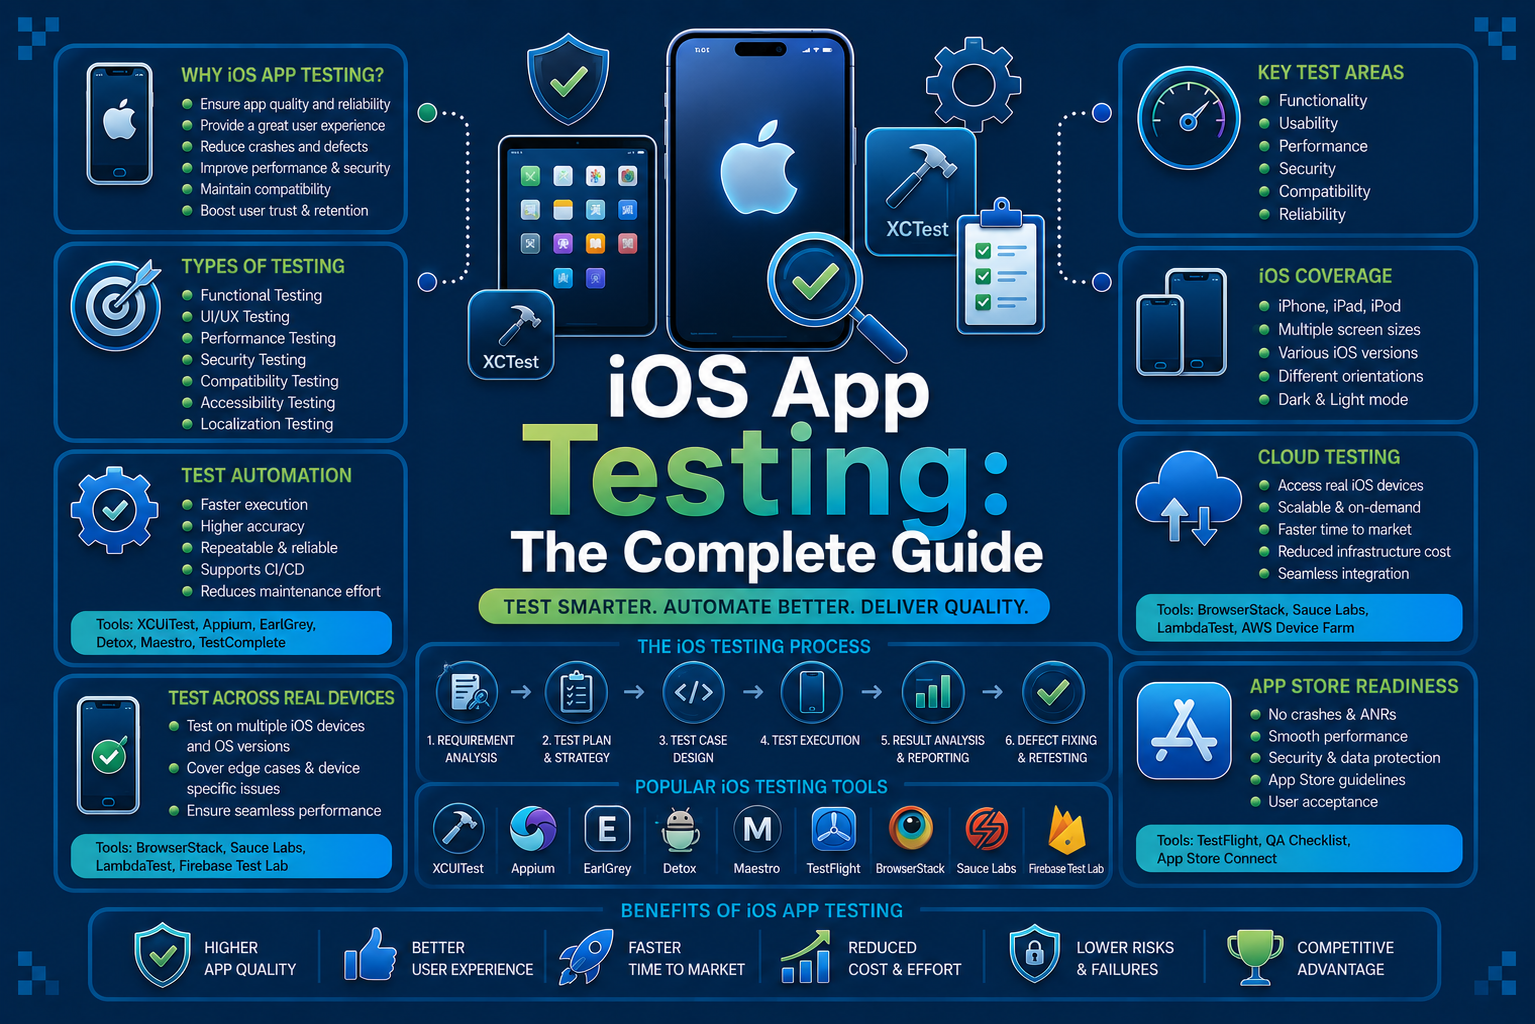

Apple users do not forgive a broken app. A crash on launch, a laggy scroll, a button that does not respond, and the app gets deleted within minutes. There is rarely a second chance.
That is what makes iOS app testing such a non-negotiable part of development. It is not a box you tick before submission.
It is the process that decides whether your app actually holds up once it leaves Xcode and lands on a real iPhone in someone’s hand.
This guide goes deep into iOS app testing, covering the testing types, the underlying frameworks like XCTest and XCUITest, real code examples, tooling, and the technical checks that actually catch problems before Apple’s reviewers or your users do.
What Is iOS App Testing
iOS app testing is the process of verifying that an iPhone or iPad app works the way it is supposed to, at the code level, the interface level, and the system level, before it reaches users.
That includes unit-level correctness of your Swift or Objective-C code, UI behavior validated through automated interaction, performance profiling under real memory and CPU constraints, and compliance with Apple’s App Store Review Guidelines.
Why iOS App Testing Is Its Own Discipline
iOS looks like a controlled, predictable environment compared to Android. In some ways it is. But that does not make testing easier. It just shifts where the difficulty lives.
A few things make iOS testing technically distinct:
- Apple pushes major OS updates every year, and adoption is fast. Most users move to the new version within weeks, so APIs, permissions, and UI behavior can shift under your app almost immediately.
- The App Store is the only distribution channel, and its review process checks not just crashes but also privacy manifests, entitlements, and API usage against Apple’s guidelines.
- Devices still vary more than people assume. Chip generations affect how Metal rendering and background processing behave, not just screen size.
- iOS sandboxes apps heavily. That restricts what you can inspect at runtime, which is why tools like Instruments and the device console matter so much for debugging.
None of this means iOS testing has to be complicated. It just means it has to be structured around how the platform actually works, not treated like a generic mobile checklist.
What Good iOS Testing Actually Covers
A solid testing strategy for iOS does not stop at “does the app open.” It typically spans several layers, each catching a different class of bug:
- Unit level logic errors in isolated functions and classes
- Integration issues between modules, APIs, and data layers
- UI and interaction bugs surfaced through simulated user gestures
- Performance regressions in memory, CPU, and battery usage
- Compatibility gaps across iOS versions, devices, and screen classes
- Security gaps in data storage, authentication, and network calls
- Compliance issues that would trigger an App Store rejection
Skipping even one of these areas is usually where things go wrong. A feature can pass every functional test and still get rejected during App Store review because of a metadata mismatch or an undeclared API usage reason nobody flagged.
Types Of iOS App Testing
There are several distinct types of iOS testing, each backed by different Apple frameworks and tooling. Most mature QA processes run a layered combination rather than relying on just one.
1. Unit Testing With XCTest
Unit testing checks individual pieces of code, like a single function or class, in isolation, without spinning up the full UI. Apple’s XCTest framework, built into Xcode, is the standard here.
A basic XCTest case for validating a login form’s email check looks roughly like this:
import XCTest
@testable import MyApp

final class LoginValidatorTests: XCTestCase {
    func testValidEmailPassesValidation() {
        let validator = LoginValidator()
        XCTAssertTrue(validator.isValidEmail("user@example.com"))
    }

    func testInvalidEmailFailsValidation() {
        let validator = LoginValidator()
        XCTAssertFalse(validator.isValidEmail("not-an-email"))
    }
}
This kind of test runs fast, does not touch the UI, and gives you immediate feedback the moment logic breaks.
It is usually the first layer developers write, since it catches errors early, before they become harder to trace bugs further down the pipeline.
2. UI And Integration Testing With XCUITest
XCUITest, also part of Apple’s testing stack, drives the app the way a real user would, tapping buttons, entering text, and asserting what appears on screen. It runs on a real device or simulator rather than in isolation.
A simple XCUITest for a login flow:
import XCTest

final class LoginFlowUITests: XCTestCase {
    func testLoginSuccess() {
        let app = XCUIApplication()
        app.launch()

        app.textFields["emailField"].tap()
        app.textFields["emailField"].typeText("user@example.com")

        app.secureTextFields["passwordField"].tap()
        app.secureTextFields["passwordField"].typeText("Password123")

        app.buttons["loginButton"].tap()

        XCTAssertTrue(app.staticTexts["welcomeMessage"].waitForExistence(timeout: 5))
    }
}
Note the waitForExistence call. iOS UI tests are notoriously prone to timing issues, since animations, network calls, and rendering do not always complete on a predictable schedule.
Hardcoded sleeps make tests slow and still flaky. Explicit waits tied to element state are more reliable.
3. Functional Testing
Functional testing confirms that features behave the way they are supposed to from a user’s perspective, often blending manual exploration with XCUITest coverage for repeatable flows.
Think login, in-app purchases, form submissions, and search. If a user taps a button, something specific should happen, and functional testing checks that it does, consistently, across builds.
4. UI And UX Testing
This is where you validate that the app looks and feels right. Layouts should hold up across screen sizes using Auto Layout constraints correctly, buttons should be tappable where they visually appear to be, and navigation should follow patterns users already expect from iOS.
Apple’s Human Interface Guidelines are worth checking against directly, since deviating too far from expected interaction patterns can hurt both usability scores and App Store approval odds.
5. Performance Testing With Instruments
Performance testing looks at how the app behaves under stress, and Instruments, bundled with Xcode, is the tool that makes this measurable instead of guesswork.
A few Instruments templates worth knowing:
| Instrument | What It Measures |
|---|---|
| Time Profiler | CPU usage and where execution time is spent |
| Allocations | Memory growth and object allocation over time |
| Leaks | Retained objects that should have been deallocated |
| Energy Log | Battery impact from CPU, network, and location usage |
| Network | Request timing, payload size, and connection behavior |
Running Leaks during a typical user session is one of the fastest ways to catch retain cycles, which are a common source of memory bloat in Swift apps using closures that capture self without [weak self].
6. Compatibility Testing
This checks whether the app works consistently across different iPhone and iPad models, screen sizes, and iOS versions, including differences in Dynamic Type scaling and Safe Area insets on newer device form factors.
Most teams support the current iOS version plus the previous one or two major versions, since that typically covers the large majority of active users within a few months of any given release.
7. Security Testing
Security testing verifies that user data, authentication flows, and payment details are properly protected.
That includes checking Face ID and Touch ID flows through the LocalAuthentication framework, Keychain storage for sensitive tokens, and proper use of App Transport Security for network calls.
Given how strict Apple is about privacy, incomplete or inaccurate privacy manifest declarations are also one of the more common reasons apps get flagged during review.
8. Accessibility Testing
Accessibility mobile app testing checks whether the app works with VoiceOver, supports Dynamic Type scaling without breaking layouts, and maintains a logical focus order for screen reader navigation.
Xcode’s Accessibility Inspector can audit a running app for missing labels, low contrast ratios, and elements that are technically present but not exposed correctly to assistive technologies.
Manual Testing Vs Automated Testing On iOS
This is one of the most common questions teams run into once they move past the basics. The honest answer is that you need both, just for different reasons.
When Manual Testing Makes Sense
Manual testing is where a real person interacts with the app the way an actual user would. It is particularly useful for:
- Exploratory testing, where you are looking for issues nobody thought to write a test case for
- Usability checks that need human judgment, like whether a transition actually feels smooth
- Early-stage testing on features that are still changing shape rapidly
The tradeoff is that manual testing does not scale well. It is slower, harder to repeat consistently across builds, and gets expensive as your regression surface grows.
When Automated Testing Makes Sense
iOS automation testing shines for repetitive, high-volume work. Regression testing is the clearest example. Every time you ship a new build, you likely need to re-verify dozens of flows that already worked before.
Automated tests, built with XCUITest and run through xcodebuild test from the command line, can execute these checks consistently and catch regressions before they reach QA.
A common flaky test cause worth knowing: dynamic element identifiers. SwiftUI in particular can regenerate accessibility identifiers between builds if they are not explicitly set, which silently breaks selectors that worked the day before.
Always assign explicit .accessibilityIdentifier() values rather than relying on default ones.
Most teams that scale their iOS testing eventually plug this automation into CI/CD, running tests automatically on every pull request through tools like Fastlane or Xcode Cloud instead of waiting for someone to trigger them manually.
This is where a platform like Panto AI fits in for teams that want AI assisted test generation and PR level checks catching issues at the point they are introduced, rather than after a full build has already shipped to QA.
Real Devices Vs Simulators
Simulators are useful early in development. They are fast, free, and good enough for basic UI and layout checks while you are iterating quickly, and they support most Instruments templates too.
But simulators run on your Mac’s architecture and cannot fully replicate real ARM chip behavior, thermal throttling, actual GPS, cellular network switching, or true battery drain. Some bugs only surface on physical hardware.
A Practical Rule Of Thumb
- Use simulators for quick iteration during active development and for most unit and UI test runs in CI
- Move to real devices once features stabilize, especially anything touching camera, sensors, or background processing
- Always test on real devices before submitting to the App Store, covering at least one older supported model
If your team cannot maintain a large physical device lab, cloud-based real device testing platforms are a reasonable middle ground, giving you access to a wider spread of chip generations and iOS versions without owning them all.
Essential iOS App Testing Tools
You do not need dozens of tools to test an iOS app well, but most teams end up piecing together something from each of these categories to cover everything from code level checks to real device coverage.
- A unit testing framework to check individual functions and classes in isolation as you write code
- A UI automation framework to simulate real user gestures like taps, swipes, and text entry across screens
- A performance profiling tool to catch memory leaks, CPU spikes, and battery drain before they reach users
- A beta distribution platform to get builds in front of real testers and collect crash reports and feedback
- A device lab or cloud device platform for testing across different screen sizes, chip generations, and OS versions
- A network debugging tool to inspect API calls, response times, and how the app behaves on poor connections
- A CI/CD pipeline to run the full test suite automatically on every commit or pull request instead of manually
- A crash and bug tracking tool to catch and log issues that slip through testing after release
That is a lot of separate tools to set up, license, and keep in sync with each other, and most teams end up spending nearly as much time managing the testing stack as they do actually testing.
How Panto AI Simplifies This
Instead of stitching together a unit testing framework, a UI automation tool, a device lab, and a separate CI pipeline, Panto AI brings this into one workflow.
It handles automated test generation, real device coverage, and PR level checks in a single platform, so issues get caught the moment code changes are pushed rather than after they have moved through five different tools.
For teams that do not want to own and maintain an entire testing stack themselves, Panto AI’s consolidation alone saves a meaningful amount of engineering time every release cycle.
iOS App Testing Checklist Before Submission
Before you submit to the App Store, it helps to run through a focused technical checklist rather than relying on memory.
Code And Logic
- Unit test coverage exists for critical business logic, not just UI
- No force unwraps left in code paths handling user or network input
- Retain cycles checked using Instruments Leaks on core user flows
Functionality
- All core user flows complete without errors on both simulator and device
- Forms validate input correctly, including edge cases and empty states
- Payment and authentication flows work end to end, including failure states
UI, UX, And Accessibility
- Visual layouts hold up across at least three screen sizes using Auto Layout, not fixed frames
- VoiceOver reads all interactive elements with meaningful labels
- Dynamic Type scaling does not break or clip text at larger sizes
Performance
- App loads within an acceptable time on older supported devices
- No unexpected memory growth during extended sessions in Instruments
- Battery and energy impact stays within reasonable limits per Energy Log
Compatibility
- Tested on the current iOS version and at least one prior major version
- Tested on both the latest iPhone and an older supported model
- Tested on iPad if your app supports it, including split view and multitasking
Security And Compliance
- Sensitive data is stored in Keychain, not UserDefaults or plain files
- App Transport Security is enforced for all network calls
- Privacy manifest accurately declares data collection and API usage reasons
- App metadata and functionality match App Store Review Guidelines
Running through this before every major release catches the majority of issues that would otherwise surface only after launch, when they are far more expensive to fix.
Where iOS Testing Is Headed
A few shifts are becoming hard to ignore across iOS QA teams right now.
Testing is moving earlier into the development cycle rather than happening as a final gate before release.
Teams are catching issues at the pull request stage instead of waiting for a full QA pass, which shortens the feedback loop considerably and reduces the cost of fixing a bug found late.
AI assisted testing is also gaining ground, particularly for identifying test gaps, reducing flaky results caused by timing and dynamic UI identifiers, and helping teams write XCUITest coverage faster.
Real device testing is becoming the default for final validation too, even as simulators remain useful for early iteration and most CI runs.
None of this replaces the fundamentals though. Solid unit test coverage, accurate XCUITest flows, careful Instruments profiling, and genuine security hygiene still form the foundation.
The tools around them are just getting faster and catching problems sooner in the pipeline.
Final Thoughts
iOS app testing is not about running every possible test on every possible device.
It is about layering unit, UI, performance, and security testing correctly, backing it with the right Apple frameworks, and catching issues before they reach either Apple’s reviewers or your users.
Layer in automation where it saves your team the most time. Get that balance right, and your app has a far better shot at holding up in the real world, not just in the simulator.