Mobile apps fail users in silence. A misaligned checkout button, a dark-mode contrast issue, or a broken layout on a Pixel Fold : none of these will fail a functional test. But they will make users uninstall your app.
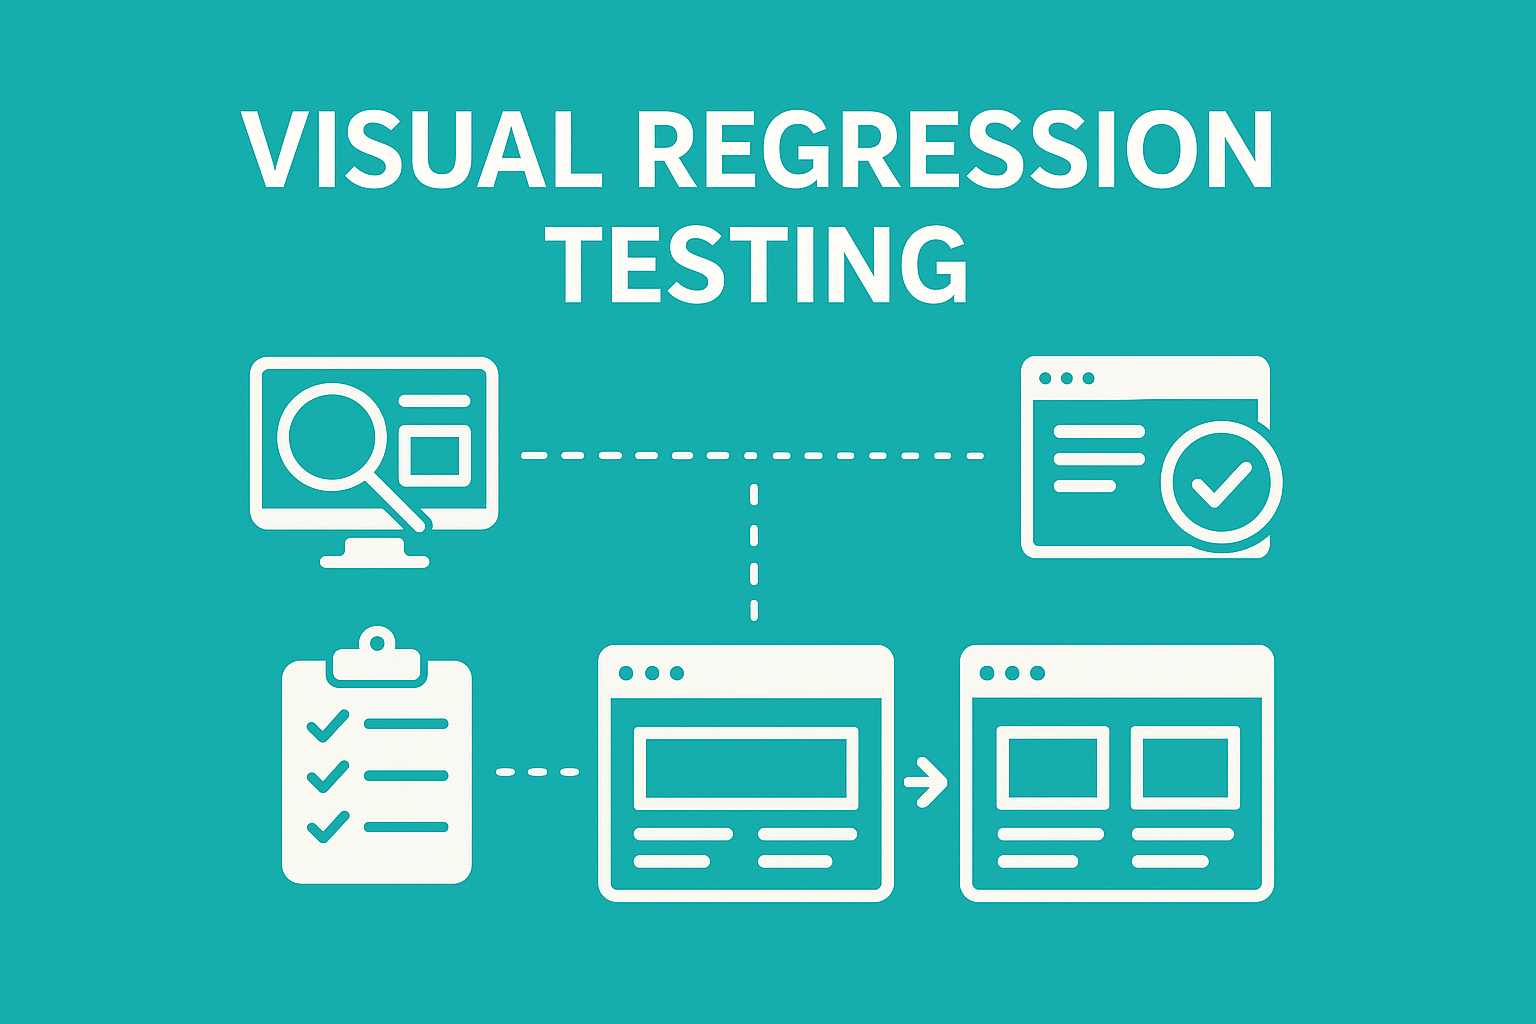
This is why visual regression testing for mobile apps has become a non-negotiable part of QA in 2026. It’s the practice of automatically catching what your eyes would catch, but across thousands of devices, OS versions, and screen sizes, at scale.
Whether you’re searching for the best mobile visual testing tools, trying to understand how mobile regression testing works, or evaluating AI-powered tools for visual regression and UI validation — this guide covers everything. We’ll walk through what visual regression testing is, how to implement it for iOS and Android, and how the top tools compare.
What Is Mobile Regression Testing? (And How Visual Fits In)
Mobile regression testing is the broader practice of re-running tests after code changes to ensure nothing that previously worked is now broken. It covers functional behavior, performance, and — critically — visual appearance.
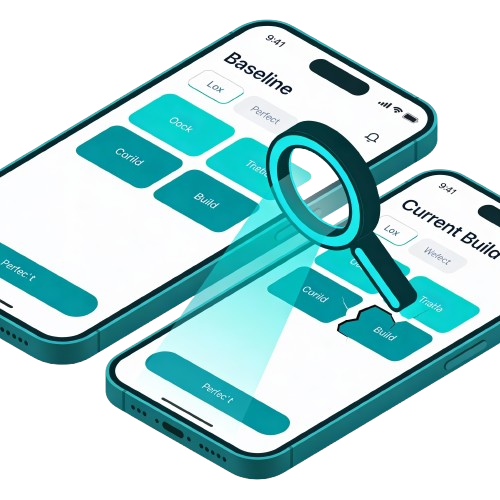
Visual regression testing is a specialized subset of mobile regression testing. While a standard regression test asks “does the login still work?”, a visual regression test asks “does the login screen still look correct on a Samsung Galaxy S24, an iPhone 15 Pro, and a budget Android device simultaneously?”
The distinction matters because the two types catch completely different bugs. Running only functional regression tests leaves your UI unguarded. Running only visual tests misses logic errors. A mature mobile app regression testing strategy requires both.
The Mobile Fragmentation Challenge
Mobile applications face a unique challenge that web applications often do not: extreme fragmentation. Your app must look pristine on an iPhone SE, a Pixel Fold, and a massive tablet simultaneously. Each of these devices has different pixel densities, aspect ratios, and operating system renderings.
A button that looks perfect on a 6-inch screen might overlap with text on a 5-inch screen. Dark mode settings on iOS might render differently than on Android, causing readability issues. Visual testing automates the verification of these thousands of permutations.
Without automation, checking every screen on every device configuration is mathematically impossible. Visual regression tools handle this scale by capturing and comparing screenshots across a device farm. This ensures that your “responsive design” is actually responsive, not broken.
Regression Testing for Mobile Applications vs. Web
Regression testing for mobile applications is fundamentally harder than web regression testing. Here’s why:
- Screen sizes: Web tests typically cover 3–5 breakpoints. Mobile apps must handle hundreds of unique device dimensions.
- OS behavior: iOS and Android render fonts, shadows, and animations differently, even on the same screen resolution.
- App state: Mobile apps deal with foreground/background transitions, push notification overlays, and system UI interruptions that web apps don’t.
- Input methods: Touch, stylus, and keyboard interactions all affect visual layout in ways a mouse-based web test won’t catch.
This is why teams searching for solutions to regression testing mobile apps often discover that web-focused tools fall short, and why mobile-first visual QA platforms exist as a separate category.
Visual vs. Functional Testing
It is crucial to understand the distinction between visual and functional testing. Functional debugging validates that the logic of the application works (e.g., “Can I log in?”). Visual testing validates the presentation (e.g., “Is the Login button blue and centered?”).
Consider the example of a banking app mentioned in industry reports. A functional test might confirm that tapping “Transfer” successfully moves money. However, if the “Transfer” button is covered by a “Help” chat bubble, the user cannot click it.
To a functional test script, the button exists in the DOM/view hierarchy, so the test passes. To a human user, the app is broken because the button is visually inaccessible. Visual regression testing catches these “visual bugs” that functional scripts notoriously miss.
Types of Visual Regression Testing
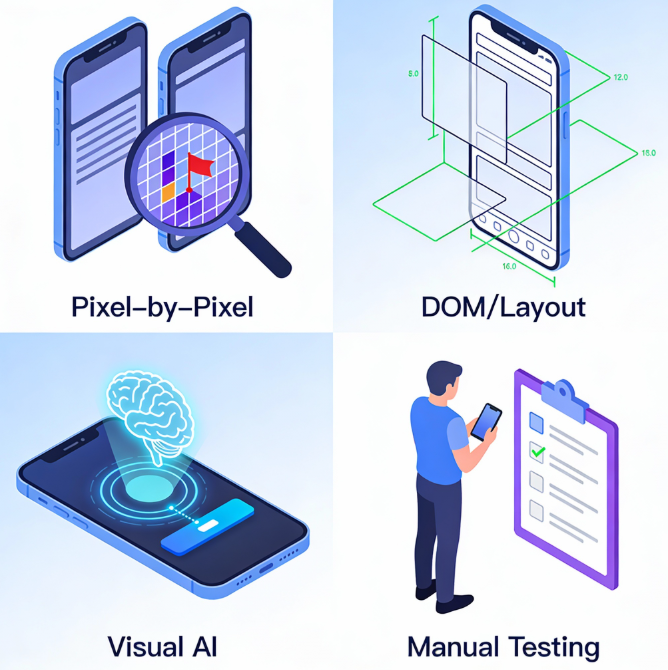
There are several approaches to performing visual validation, each with its own depth and complexity. Understanding these types helps you choose the right strategy for your mobile CI/CD pipeline.
1. Pixel-by-Pixel Comparison
This is the most traditional form of automated visual testing. The tool takes a baseline screenshot and compares it to a new screenshot of the same screen. It analyzes the images pixel by pixel to identify any differences.
If a single pixel color code changes, the test fails and flags the difference. While accurate, this method is known for being brittle and prone to false positives. Minor rendering differences between device GPUs can cause failures even if the UI looks fine to humans.
2. DOM-Based/Layout Comparison
Instead of looking at pixels, this approach analyzes the structure of the UI elements. For mobile, this means inspecting the View Hierarchy (iOS) or Accessibility Tree (Android). It compares the size, position, and attributes of elements against a baseline.
This method is more robust against minor pixel rendering differences (like anti-aliasing). However, it might miss graphical corruptions that don’t affect the layout structure. For example, if an image loads as a black box but retains the correct dimensions, this test might pass.
3. AI-Powered Visual Regression Testing
In 2026, the fastest-growing category in mobile visual QA is AI-powered testing tools for visual regression and UI validation. These tools don’t just compare pixels, they understand what elements mean.
An AI model knows that a “Buy Now” button should be prominently visible and will flag it as a bug if it’s cut off by a banner, even if the pixel coordinates have shifted by only a few points.
This semantic understanding is what separates modern visual QA testing tools from legacy screenshot diffing. It’s why teams doing mobile web visual testing are increasingly switching from pixel-based tools to AI-driven platforms.
4. Manual Visual Testing
As the name implies, this involves a human tester looking at the app. It is often done during exploratory testing or final UAT (User Acceptance Testing). While effective for spotting “weird” issues, it is slow, expensive, and unscalable.
Humans also suffer from “change blindness”—we often miss small details that automated tools catch. Traditional testing is best reserved for checking new features for the first time. Regression—checking old features repeatedly—should always be automated.
Implementing Mobile Visual QA: Strategies & Challenges
Implementing a robust visual testing strategy requires more than just installing a tool. It involves integrating visual checks into your development lifecycle to catch bugs early. Here is how to build a scalable visual regression workflow for mobile.
Common Challenges in Mobile Visual QA
Implementing visual testing for mobile comes with a specific set of hurdles. These challenges often cause “flaky” tests if not addressed properly during the setup phase. Understanding them is key to building a stable and reliable visual automation suite.
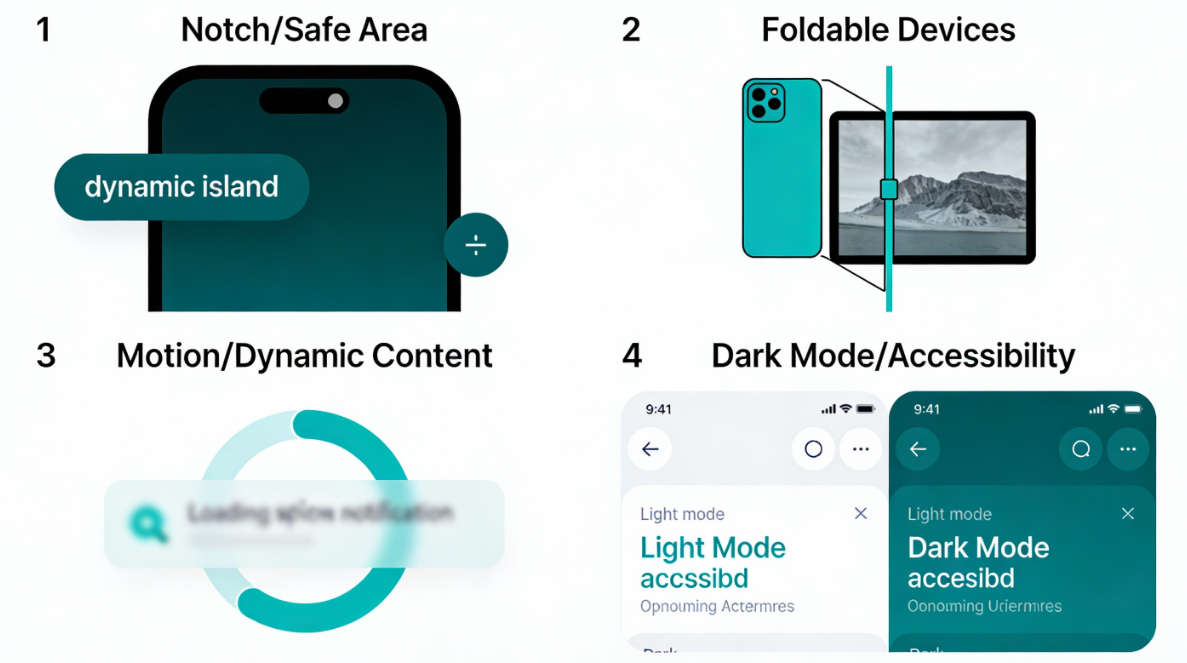
The “Notch” and Safe Areas
Modern mobile apps feature diverse screen cutouts, from dynamic islands to teardrop notches. A UI element might look fine on a standard screen but get cut off by the camera notch on another. Visual tests must verify that content respects the “safe area” insets on every device model.
If your test only runs on a rectangular emulator, you will miss these critical layout bugs. You need to capture screenshots on devices with physical notches to ensure buttons aren’t hidden. Tools in 2026 now explicitly support “safe area masking” to validate these regions.
Foldable and Dual-Screen Devices
The rise of foldable phones (like the Pixel Fold and Galaxy Z series) introduces dynamic screen states. Your app must transition seamlessly from a folded “phone” state to an unfolded “tablet” state. Visual testing must capture snapshots in both postures to ensure the layout reflows correctly.
A common bug is the “hinge gap,” where content gets split awkwardly across the two screens. Automated tests need to trigger the “unfold” event and capture a new baseline for that state. Ignoring this category means ignoring a premium segment of your user base.
Dynamic Content and Animations
Mobile apps are alive with motion, loading spinners, and real-time data updates. Capturing a screenshot while an animation is playing results in a blurry, inconsistent image. This leads to false positives, where the test fails simply because the spinner was at 45° instead of 90°.
To combat this, you must disable animations in your test environment or use custom commands. Dynamic text (like “Welcome, User!”) must be masked or replaced with static mock data. Without these controls, your visual regression suite will be too noisy to be useful.
Dark Mode and Accessibility
Users expect your app to respect their system-wide preferences, especially Dark Mode. A common visual bug is dark text rendering on a dark background, making it unreadable. Visual tests must run separate passes for Light and Dark themes to catch these contrast issues.
Similarly, testing for “Large Text” accessibility settings is often overlooked. When a user bumps up their font size, does your text wrap correctly or break the container? Automated visual testing can cycle through these font scales to verify layout integrity.
Running Visual Regression Tests with Maestro
Maestro is one of the most popular mobile UI testing frameworks in 2026, especially for React Native and cross-platform apps. If your team uses Maestro for functional tests, you can extend it for Maestro visual regression checks with the right tooling.
Here’s how Maestro-based visual regression works:
- Write a Maestro flow that navigates to the screens you want to validate.
- Add screenshot capture steps at key moments (after page load, after interaction).
- Pipe those screenshots to a visual comparison engine — either your tool’s SDK or an open-source solution like Visual Regression Tracker.
- Store baselines in your repo or cloud storage tied to your CI branch.
- Review diffs in PRs, any visual change blocks the merge until approved.
Example Maestro flow with visual checkpoint:
yaml
- launchApp
- tapOn: "Login"
- assertVisible: "Home Screen"
- takeScreenshot: "home_baseline"
How to Implement Visual Regression Testing for Mobile Apps
Implementing a robust visual testing strategy requires more than just installing a tool. It involves integrating visual checks into your development lifecycle, aligning your team around a clear process, and catching bugs before they reach production. Here’s everything you need to set it up properly.
Technical Setup
1. Define Your Scope
Do not try to visually test every single screen and state immediately. Start with your critical path: Login, Home Screen, Checkout, and Profile. Identify the screens that have the highest business value and risk.
2. Handle Dynamic Data
Mobile apps are full of dynamic data: timestamps, user names, account balances, and ads. If your baseline has “User: John” and the new test has “User: Jane,” the test will fail. You must “freeze” or “mask” these dynamic regions.
Most tools allow you to draw a mask over specific areas to ignore them during comparison. Alternatively, use “mock data” in your test environment to ensure consistent text every time. Clean test data is the backbone of stable visual regression testing.
3. Choose the Right Moment
Decide when to trigger screenshots during your test execution. You should capture the screen only after all animations have settled and data has loaded. Taking a screenshot 100ms too early results in a blurry, inconsistent image that fails for the wrong reason.
Use explicit waits in your automation scripts (e.g., “Wait for element X to be visible”). Some advanced tools listen to the app’s network and UI thread to know exactly when it is idle. This prevents “flaky” tests caused by loading spinners or partial transitions.
4. Establish Baselines
Run your test suite once on a stable version of your app to generate initial screenshots. Review these images carefully, since they will be the standard of truth for all future tests. Commit these baselines to your version control or the cloud storage provided by your tool.
Team Process & Workflow
1. Assign Visual QA Ownership
Decide whether visual regression is owned by QA engineers, frontend developers, or both. In most mobile teams, developers approve intentional changes (e.g., “yes, I redesigned this button”) while QA engineers investigate unintentional regressions. Without clear ownership, flagged diffs sit unreviewed and block releases.
2. Define “Visual Done” Criteria
A user story is only completed when it passes visual QA on a defined device matrix. This matrix typically includes: the latest iOS device, the latest Android flagship, a mid-range Android device, and a tablet. Document this matrix and keep it updated quarterly as new devices ship.
3. Set Sensitivity Thresholds
Most visual QA testing tools let you configure a difference threshold (e.g., “fail only if more than 0.1% of pixels differ”). Start conservative and loosen thresholds as you learn what your app’s normal rendering variance looks like across your device matrix.
4. Version Your Baselines
Baselines must be tied to branches. If a developer is working on a redesign in a feature branch, the baseline for that branch should reflect the new design, and not the main branch’s design. Poor baseline versioning is the #1 cause of noise in visual QA pipelines.
5. Integrate Into PR Reviews
The best-in-class visual QA testing workflow surfaces diffs directly in pull requests. Developers see “3 visual changes detected” alongside their code review, and can approve or reject each one inline. This closes the feedback loop without requiring a separate QA dashboard visit.
Best Practices for Mobile Visual QA
- Cross-Platform Validation: Always maintain separate baselines for iOS and Android for improved cross-platform testing. Even identical code renders differently across the two operating systems: font weights, shadow rendering, and animation timing all vary natively.
- Responsive & Orientation Testing: Test in both Portrait and Landscape orientations, and across phone and tablet screen sizes. A layout that looks correct in portrait can break entirely when the device is rotated.
- Component-Level Testing: Don’t only test full screens. Isolate critical UI components — buttons, cards, modals, navigation bars — and test them independently. This makes it faster to pinpoint exactly which component introduced a regression.
- Disable Animations in Test Environments: Animations are the leading cause of flaky visual tests. Most mobile frameworks allow you to disable or accelerate animations via build flags or test configuration. Always do this before capturing screenshots.
- Human Review in PRs: Not every visual diff is a bug. Some are intentional design changes. Build a workflow where developers can review and approve diffs directly in the pull request, so legitimate changes don’t permanently block your pipeline.
- Run Separate Passes for Dark Mode and Accessibility: Dark Mode and large text settings are common sources of contrast and layout bugs that only appear under specific system preferences. Build these passes into your regular test runs, not just exploratory testing.
Visual regression testing is no longer a luxury for mobile testing; it is a necessity. As apps become more complex and device fragmentation increases, manual checking becomes obsolete. The risk of a visual bug causing user churn is simply too high to ignore.
Multiple tools like the ones above are leading the charge by making visual testing smarter and more autonomous. By integrating these tools into your modern QA pipeline, you ensure that your app always looks its best. Start small, define your baselines, and let the AI handle the pixels.
FAQ’s
Q: What is a visual regression testing in mobile QA example?
A: A typical example involves automating a login or checkout screen using Appium, capturing a baseline screenshot, and comparing it against future builds. For instance, after a UI refactor, the test captures a new screenshot and performs image diffing against the approved baseline. If layout shifts, color changes, or overlapping elements are detected, the build fails. Advanced setups mask dynamic regions such as timestamps or user-specific data. In CI/CD, this runs automatically on every pull request across multiple device configurations.
Q: How do you perform visual regression testing with Playwright?
A: Playwright supports built-in screenshot comparison using its toMatchSnapshot() assertion. For mobile contexts, it can emulate mobile browsers or integrate with device clouds for hybrid apps. The workflow involves generating baseline snapshots during the first run and storing them in version control. Subsequent runs automatically compare screenshots and produce diffs. For native mobile apps, Playwright typically complements webview testing rather than replacing Appium. Stabilizing animations and masking dynamic content is essential to reduce flakiness.
Q: How does visual regression testing work with Selenium?
A: Selenium does not natively provide visual diffing but integrates with third-party tools like Applitools, Percy, or open-source image comparison libraries. The test script navigates to a screen, captures a screenshot via WebDriver, and sends it to the visual comparison engine. Differences are analyzed either pixel-by-pixel or using AI-based semantic comparison. In mobile contexts, Selenium is often paired with Appium for hybrid app testing. Baseline management and diff approval workflows are handled externally by the visual platform.
Q: What is Chromatic in visual regression testing?
A: Chromatic is primarily a visual testing and UI review platform for Storybook component libraries. It focuses on frontend component-level regression rather than full native mobile app testing. Teams use it to validate UI changes in isolated components before integrating into mobile or web builds. Chromatic performs automated snapshot comparisons and integrates with pull requests. It is best suited for design systems and cross-platform UI components rather than device-fragmented native QA.
Q: What is Visual Regression Tracker?
A: Visual Regression Tracker is an open-source platform for managing screenshot baselines and image comparisons. It is framework-agnostic and can integrate with any test runner capable of producing screenshots. The system supports region masking, diff visualization, and history tracking. Teams commonly deploy it via Docker for self-hosted control. While it lacks AI-based semantic comparison, it offers flexibility and data sovereignty advantages.
Q: What is the difference between pixel-based and AI-based visual regression tools?
A: Pixel-based tools compare raw RGB values between baseline and new screenshots, making them precise but sensitive to minor rendering variations. AI-based tools analyze structural layout and semantic relationships, reducing false positives from anti-aliasing or GPU differences. Pixel diffing is computationally simpler but brittle at scale. AI-driven systems are more suitable for fragmented mobile ecosystems with diverse devices and OS versions. The tradeoff is typically cost and vendor dependency.
Q: Can visual regression testing be integrated into CI/CD pipelines?
A: Yes. Modern visual testing tools integrate directly with CI systems such as GitHub Actions, GitLab CI, Jenkins, and Bitbucket Pipelines. The workflow automatically captures screenshots during test execution, compares them to baselines, and blocks merges if discrepancies exceed defined thresholds. Reports are attached to pull requests for developer review. Parallelization and device cloud execution are often used to maintain build speed. Proper baseline versioning is critical to avoid drift across branches.
Q: What is mobile visual testing and how is it different from standard mobile regression testing?
A: Mobile visual testing validates the visual appearance of an app’s UI — including layout, spacing, typography, colors, and alignment — across devices and screen sizes. Standard mobile regression testing focuses on functional behavior and verifies that features still work after code changes. Visual testing ensures the app still looks correct, while regression testing ensures it still behaves correctly. A comprehensive mobile QA strategy requires both.
Q: How do you perform visual regression testing with Maestro?
A: Maestro does not include built-in visual diffing, but it integrates well with external visual testing workflows. A common setup involves running Maestro flows, capturing screenshots at important UI states using takeScreenshot, and sending those screenshots to a visual comparison engine such as Panto AI or Visual Regression Tracker. Baseline images are then stored and validated automatically in CI/CD pipelines.
Q: Is mobile web visual testing different from native app visual testing?
A: Yes. Mobile web visual testing focuses on websites running inside mobile browsers and often uses tools like Playwright or Percy with responsive browser emulation. Native mobile app visual testing requires direct integration with frameworks such as Appium, Espresso, or XCUITest to capture screenshots from within the application itself. Native testing is generally more complex because device manufacturers and operating systems introduce greater rendering variation than mobile browsers.

