Hybrid React Native apps combine native UI with web content (WebViews), and testing those mixed flows is uniquely challenging.
Failures in embedded web pages — OAuth redirects, third-party checkouts, or analytics scripts — break user journeys even when native screens are fine.
This guide shows you how to use Playwright to reliably automate the web portion of hybrid apps on Android: setup, best practices, sample tests, CI integration, and common pitfalls to avoid.
By the end you’ll have a repeatable strategy to test webviews alongside native tests and keep CI fast and actionable.
Why Hybrid Testing Matters
Hybrid components are common in production React Native apps.
- OAuth and SSO pages often live on the web.
- Payment and checkout flows may be hosted by a third party in a WebView.
- Support portals, marketing, and documentation can be rendered inside the app.
When the web layer fails (redirects break, third-party scripts error, or responsive layout regresses), the user journey stops even though native screens may be fine.
Hybrid testing ensures those cross-layer journeys work end-to-end by validating the web content and its interaction with the native shell.
If the web layer fails (redirects break, responsive layout fails, third-party script errors), the user journey is interrupted—even when native screens are fine.
Hybrid testing validates the integration points and user journeys that span both native and web layers.
Key Testing Tools for React Native Hybrid Apps
Before diving into Playwright, it helps to compare popular frameworks for React Native apps:
| Testing Framework | Focus | Strengths | Limitations |
|---|---|---|---|
| Playwright | Web and Hybrid (Android WebViews) | Fast, unified web API; excellent for webviews. Auto-waits and parallel tests. | No native UI control – can’t tap RN views outside webviews. Android-only for WebView (iOS requires workarounds). |
| Detox | React Native (iOS & Android) | Designed for RN; can tap native components directly. Integrates with Metro. | Limited to RN; cannot drive webview content inside the app. |
| Appium | Native and Hybrid (Android/iOS) | WebView + native support; cross-platform; widely used. Can automate any element via accessibility IDs. | Setup can be complex; slower; test scripts tend to be more brittle. |
| Maestro | Mobile (Android/iOS) | Supports hybrid apps and gestures; simpler syntax. | Emerging tool, less mature ecosystem. |
In React Native projects, Detox and Appium are commonly used for end-to-end tests. Appium can also drive WebViews but requires special configuration.
Playwright shines when your app’s core logic lives in web code (Cordova/Capacitor style) or when using complex web-based flows (e.g. embedded PWAs).
It treats the WebView as a browser context, letting you write tests in JavaScript/TypeScript with the familiar page.click(), page.fill(), etc.
Where Playwright Fits In
Playwright excels at automating and validating browser-based functionality: rendering, navigation, form submission, redirects, cookies, network conditions, and cross-origin flows. That makes it ideal for:
- Web authentication and SSO flows.
- WebView content verification (HTML/CSS/JS behavior inside the app).
- Device-emulated mobile web tests for responsive behavior.
- Testing hosted external integrations (payment gateways, analytics redirects).
| Test Layer | Typical Tool |
|---|---|
| Unit Tests | Jest |
| Component Tests | React Native Testing Library |
| Web / Hybrid (WebViews) | Playwright |
| Native E2E (gestures, hardware) | Detox / Appium |
Where Playwright helps: web authentication flows, WebView content verification, device-emulated responsive checks, and testing third-party web integrations.
Setting Up The Playwright Test Environment
Step 1: Basic Requirements
Before writing tests, ensure your development environment meets Playwright’s mobile testing requirements. Below are the key requirements and short guidance for each item so you can get started quickly.
- Node.js and Playwright – Install Node (v14+) and Playwright via
npm init playwright@latestornpm i -D @playwright/test. If you plan to test Android WebViews, runnpx playwright install android. - Android SDK / Emulator – Install Android SDK (Platform-Tools) and an emulator (AVD) or connect a real device via USB. Make sure USB debugging is enabled in Developer Options on the device.
- ADB (Android Debug Bridge) – Add
adbto yourPATH. Verify connectivity withadb devices— your device or emulator should be listed. - Chrome / WebView Version ≥ 87 – The Android system WebView or Chrome on the device must be recent (Playwright requires WebView / Chrome 87 or newer).
- Chrome Debugging Flag – On non-rooted devices, enable the flag
Enable command line on non-rooted devicesinchrome://flagsso Playwright can talk to Chrome DevTools. - iOS (Optional) – Playwright does not natively support automating WKWebViews on iOS. If you must test iOS WebViews, consider tools like Appium or community tools such as Canter. This guide focuses on Android.
Requirements Checklist
| Requirement | Description |
|---|---|
| Node.js & Playwright | Latest Node.js (v14+) and Playwright (npm i -D @playwright/test). |
| Android SDK & AVD | Android SDK with emulator or a real device. Enable USB debugging. |
| Android Debug Bridge (ADB) | adb must be running and list devices with adb devices. |
| Chrome 87+ on Device | Install or update Android System WebView / Chrome to Chrome 87 or newer. |
| Chrome Debugging Flag | Enable chrome://flags/#enable-command-line-on-non-rooted on the device. |
Install Playwright Android Dependencies
To set up Playwright’s test runner and Android support, run these commands in your project directory:
# Install Playwright test runner
npm init -y
npm i -D @playwright/test

# Install Android support (Chromium/WebView)
npx playwright install android
Short notes: If npx playwright install android fails (commonly on CI/Linux runners due to missing system libraries), try:
npx playwright install --with-depsOr ensure required system libraries are present on your runner.
Step 2: Launching The React Native App And Attaching Playwright
When the environment is ready, the next step is to start your React Native app on an Android device/emulator and then attach Playwright to the app’s WebView. The general flow is:
Run Or Install The App
You can sideload the APK or launch your app using ADB. Example ADB commands:
adb install path/to/app.apk
adb shell am start -n com.example.myapp/.MainActivity
Replace com.example.myapp/.MainActivity with your app’s package and main activity. If using React Native local development you can also run:
npx react-native run-androidConnect Playwright To The Device
In your test file, use Playwright’s Android API to discover and connect to the device. Example (Node/JS):
import { _android as android } from '@playwright/test';

(async () => {
  // Connect to the first available Android device/emulator
  const [device] = await android.devices();
  console.log(`Connected to ${device.model()} (S/N: ${device.serial()})`);
  // Optional: screenshot device home
  await device.screenshot({ path: 'device-home.png' });
})();
The call android.devices() returns connected Android devices that Playwright can use.
Launch The App With ADB Shell (If Needed)
If the app isn’t running, you can start it from Playwright via shell commands on the device:
// Stop then start the app
await device.shell('am force-stop com.example.myapp');
await device.shell('am start -n com.example.myapp/.MainActivity');
Adjust package and activity names as required.
Attach To The App’s WebView
Once the app is running, request Playwright to find the WebView instance by package name and obtain a Playwright page that represents the WebView content:
const webview = await device.webView({ pkg: 'com.example.myapp' });
const page = await webview.page(); // Playwright Page for WebView content
After this you have a normal Playwright page object and can interact with the web UI inside the WebView as if it were a mobile browser page.
Handling Multiple WebViews
If your app creates multiple WebViews, device.webView() may hang or attach to the wrong instance. Options to handle this:
- Ensure only one WebView is active at attach time (close or pause others).
- Use newer Playwright versions (bug fixes often land that address multiple-webview issues).
- Specify additional criteria at attach time (where supported) such as process name.
Step 3: Writing Playwright Tests For The WebView
Once you have page = await webview.page(), you use Playwright’s web API normally. Below is a simple example that interacts with a login form inside the WebView.
// Wait for the login form inside the WebView
await page.waitForSelector('#username');
await page.fill('#username', 'testuser');
await page.fill('#password', 'secret123');

// Use tap() to simulate touch
await page.tap('#login-button');

await page.waitForSelector('#welcome-message');
const welcomeText = await page.textContent('#welcome-message');
console.log(`Logged in, message: ${welcomeText}`);
Key Points For Mobile Web Testing
- Use Touch Events – Prefer
page.tap()orlocator.tap()overpage.click()so mobile touch events (touchstart/touchend) fire properly. - Selectors – Use standard CSS/text selectors; switch frames where necessary if the WebView loads iframes.
- Navigation & Waits – Playwright auto-waits for many actions, but use explicit
waitForNavigationor selector waits if pages take longer to load on mobile. - Multiple Pages/Popups – If WebView spawns popups, capture them using
page.context().on('page', ...). - Screenshots – Use
await page.screenshot()for the WebView content andawait device.screenshot()for the full device screen (native + web). - Browser Context – The WebView page runs in its own browser context. Manage cookies and sessions with Playwright APIs as needed.
Example verifying a product page inside the WebView:
// Navigate inside the WebView
await page.goto('https://example.com/product/42');

// Validate product title
await page.waitForSelector('h1.product-title');
await expect(page.locator('h1.product-title')).toHaveText('Cool Widget');
Step 4: Setting Up Playwright Test Runner
Rather than running ad-hoc scripts, use Playwright Test to organize, run and report on test suites. Example playwright.config.ts snippet that targets Android:
import { defineConfig, devices } from '@playwright/test';

export default defineConfig({
  projects: [
    {
      name: 'AndroidWebView',
      use: {
        // Target Android devices; this preset uses the first available device via ADB.
        channel: 'chrome',
      },
    },
  ],
});
And a sample test file using the Android fixtures:
import { test, expect, _android as android } from '@playwright/test';

test('hybrid app login flow', async () => {
  const [device] = await android.devices();
  // assume the app is installed & launched
  const webview = await device.webView({ pkg: 'com.example.myapp' });
  const page = await webview.page();

  // interact with page
  await page.waitForSelector('#username');
  await page.fill('#username', 'testuser');
  await page.tap('#login-button');
  await expect(page.locator('#welcome-message')).toBeVisible();
});
Run tests with:
npx playwright testContinuous Integration and Reporting
Integrating your hybrid app tests into CI is similar to any Playwright workflow. You commit code, a CI runner starts an emulator/device, and runs your Playwright tests, producing a report. For example, you might add a GitHub Actions workflow like:
yamlCopyname: Playwright Android Tests
on: [push, pull_request]
jobs:
  test:
    runs-on: ubuntu-latest
    steps:
      - uses: actions/checkout@v3
      - uses: actions/setup-node@v4
        with:
          node-version: '18'
      - run: npm ci
      - run: npx playwright install --with-deps
      - run: |
          adb start-server
          adb devices
      - run: npx playwright test
      - uses: actions/upload-artifact@v3
        with:
          name: playwright-report
          path: playwright-report/
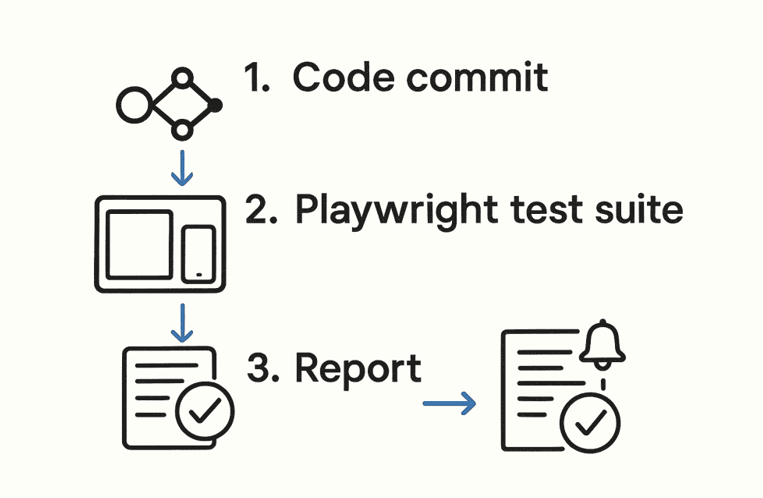
The diagram above illustrates a typical CI workflow:
- developers commit code (Step 1)
- the Playwright test suite runs on Android emulators or devices (Step 2)
- then a report is generated (Step 3).
Playwright Test produces HTML reports and traces by default; CI systems can archive these for review.
Common Challenges and Tips
- Multiple WebViews: As noted, if your app creates more than one WebView, Playwright’s
device.webView()might attach to the wrong one or hang.
In Playwright v1.34+ this issue is fixed, so ensure you use an up-to-date version. Alternatively, streamline the app so only one WebView is active during tests. - Native dialogs and interactions: Playwright cannot tap native dialogs (permission prompts, etc.).
If your app triggers an Android permission dialog (e.g. camera access), you must automate it with ADB or Appium, or grant permissions ahead of time. You can usedevice.grantPermissions({ package: '...', permissions: [...] })if needed. - Page.waitForXXX: Because Playwright waits for network and rendering, your tests can be reliable. However, mobile performance can be slower; consider increasing timeouts if pages take longer to load.
- Context and Cookies: Be aware that Playwright’s WebView context is separate from your desktop browser context. If the web content requires login or cookies, manage them via standard Playwright APIs.
(Note: some Chromium/WebView versions may have quirks with cookie storage. If you encounter errors like “Browser context management is not supported,” it’s due to a low-level WebView limitation. Updating the Android WebView system component on the device often helps.) - Debugging: Use
await device.screenshot()andawait webview.page().screenshot()to debug. Playwright’s trace viewer can also record sessions to inspect step-by-step. - Mobile Gestures: For advanced gestures (swipe, pinch), Playwright doesn’t have one-liners, but you can simulate drag with
page.mouse.down()/page.mouse.move()/page.mouse.up(). There are no built-in pinch, but you could callpage.evaluatewith JavaScript to trigger zoom if needed. - iOS Hybrid: If you need to test an iOS React Native app’s WebView, Playwright alone won’t suffice. Tools like Canter (for Safari/WKWebView automation on macOS) or Appium must be used.
Currently, Playwright’s WebKit engine is only accessible via emulation of desktop Safari or mobile Safari (i.e., it cannot attach to an iPhone app’s WebView in the same way).
Conclusion
Testing hybrid React Native apps involves bridging the native and web worlds. Playwright provides a powerful way to automate the web portion of a hybrid app by leveraging Android’s debugging interfaces.
By setting up the Android device/emulator, launching the React Native app, and attaching to its WebView, you can write Playwright tests that fill forms, tap buttons, and assert content as if in a mobile browser.
This complements native-focused tools (like Detox/Appium) by covering the webview logic and UI.
In summary, to test a hybrid RN app with Playwright:
- Prepare the environment (Node.js, Playwright, Android SDK, Chrome 87+).
- Launch the app on a device or emulator (via ADB/
run-android). - Attach to the WebView using
device.webView({ pkg: 'your.app.pkg' })and get thepage. - Drive tests in the
pagecontext using regular Playwright commands (page.fill,page.tap,page.waitForSelector, etc.), simulating mobile user actions. - Integrate into CI by running your Playwright tests on emulators/devices and publishing reports.
By following this approach and watching for known issues (multiple webviews, permission dialogs, etc.), you can build a robust end-to-end testing strategy for React Native hybrid apps.
This not only validates your web views but also ensures that the hybrid user experience remains reliable across releases.

