

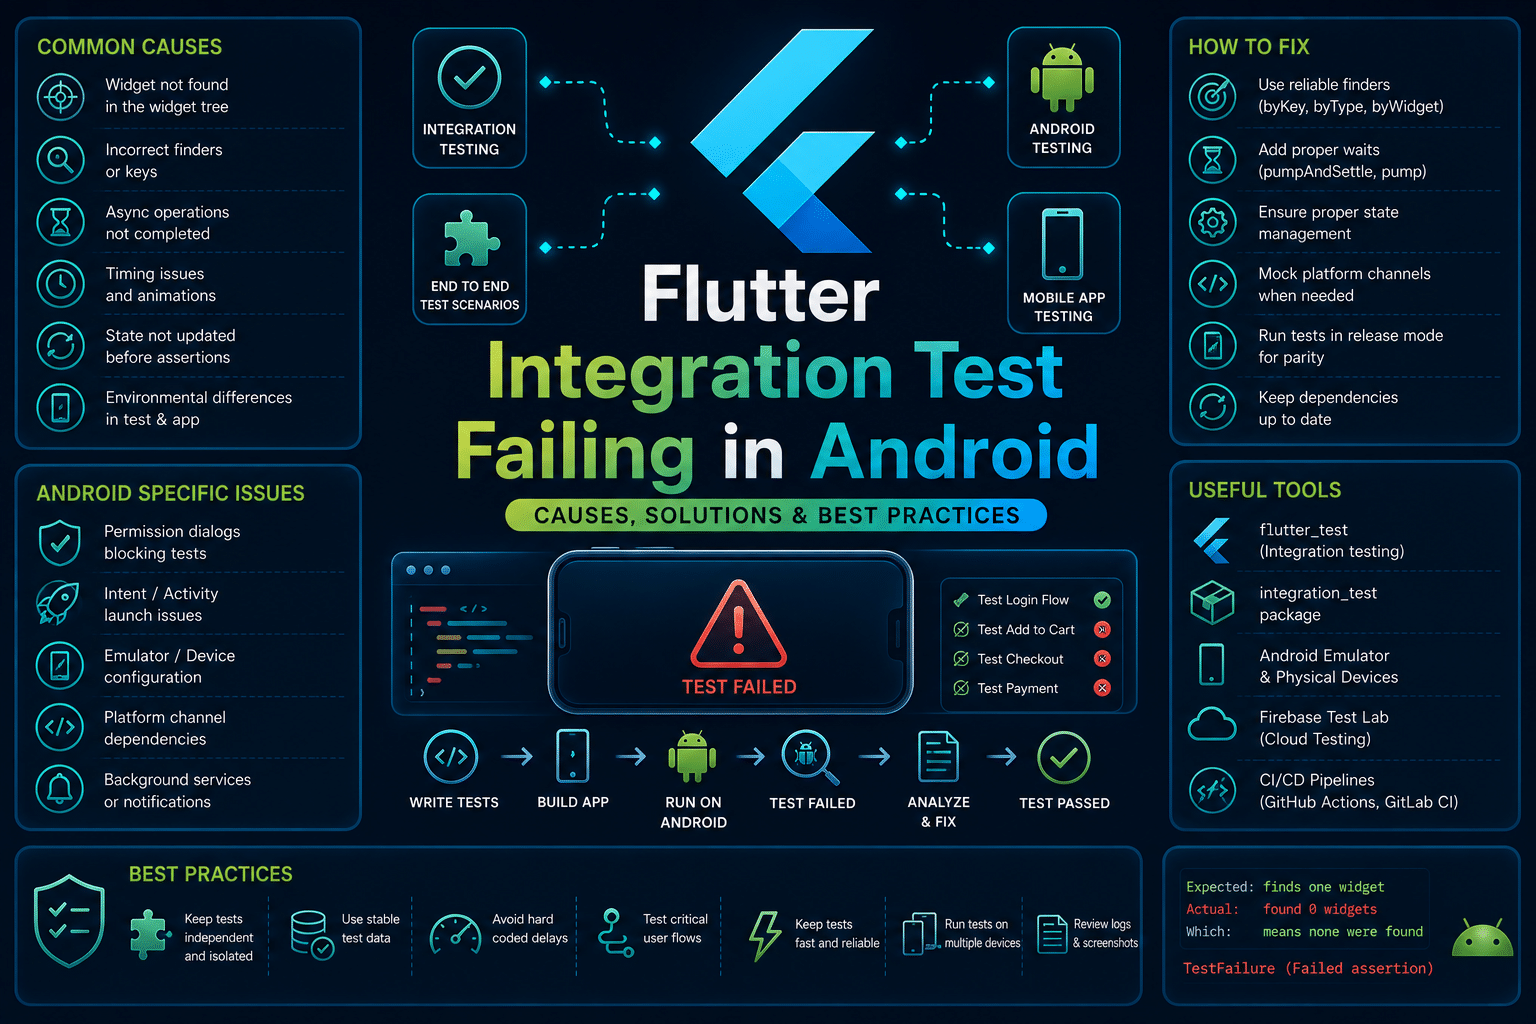

Flutter integration test failures on Android occur within Flutter’s own end to end testing framework, not Android Espresso, Appium, or native instrumentation tests.
If your integration_test suite builds successfully but fails during execution on an Android emulator or physical device, this guide covers that scenario.
In most cases, the failure does not point to a bug in your application itself. Instead, it indicates that the test environment, test synchronization, Android configuration, or application state prevented the integration test from completing successfully.
The key is identifying whether the failure occurs before the test starts, while interacting with widgets, or during teardown.
What Is Flutter Integration Test Failing on Android?
A Flutter integration test failure on Android means that the integration_test package was unable to execute or complete a test successfully on an Android device or emulator.
Unlike widget tests, integration tests run against a fully built application and interact with the real Android runtime.
These failures can happen before the first test executes, while Flutter is waiting for widgets to settle, during user interactions, or while communicating with the Android instrumentation process. The error message varies depending on where execution stops.
This differs from Flutter build failures, which prevent the APK from compiling, and from unit or widget test failures, which execute entirely within the Dart testing environment.
If your application installs successfully but the integration test itself fails on Android, you are troubleshooting the correct issue.
What Causes Flutter Integration Test Failing on Android?
Flutter integration tests on Android can fail for several reasons, ranging from test synchronization issues to Android environment configuration problems.
In most cases, the failure is not caused by a bug in the test framework itself, but by conditions that prevent the application from reaching the expected state during execution.
Understanding the underlying cause is the fastest way to narrow down the debugging process.
1. Asynchronous Operations Never Complete
The most common cause is asynchronous work that never finishes.
Continuous animations, pending network requests, background timers, or polling services can keep scheduling frames indefinitely, preventing pumpAndSettle() from completing and eventually causing the test to time out.
2. Incorrect Android Test Configuration
An incorrect Android test setup can prevent the integration test framework from starting or communicating with the application properly.
Missing instrumentation runners, outdated Gradle dependencies, incompatible AndroidX testing libraries, or a misconfigured androidTest directory can all lead to test failures before execution begins.
3. Unpredictable Application State
Integration tests are most reliable when they begin from a clean, known state.
Tests that depend on existing login sessions, cached data, granted permissions, or previously created records may pass locally but fail on fresh Android emulators or CI devices where none of that state exists.
4. Device Performance and Environment Constraints
Android emulators and CI runners often have limited CPU and memory resources, making application startup and UI rendering slower than on a developer’s machine.
These delays can cause synchronization operations to exceed their timeout limits even though the application would eventually reach the expected state.
5. Flutter SDK or Plugin Compatibility Issues
Version mismatches between the Flutter SDK, the integration_test package, Android Gradle Plugin, or third-party plugins can introduce Android-specific integration test failures.
This is especially common after upgrading Flutter without updating dependent packages to compatible versions.
How To Reproduce The Flutter Integration Test Error
A common reproduction scenario is calling pumpAndSettle() while the application continuously performs an animation or repeatedly polls a backend service, preventing the widget tree from becoming idle.
import 'package:flutter_test/flutter_test.dart';
import 'package:integration_test/integration_test.dart';

void main() {
  IntegrationTestWidgetsFlutterBinding.ensureInitialized();

  testWidgets('login flow', (tester) async {
    // App contains a loading animation that never stops

    await tester.tap(find.text('Login'));

    await tester.pumpAndSettle(
      const Duration(seconds: 30),
    );

    expect(find.text('Dashboard'), findsOneWidget);
  });
}
Test failed. Exception:

pumpAndSettle timed out.
The widget tree did not settle within the timeout.
Test failed after 30 seconds.
How To Fix Flutter Integration Test Failing on Android
The right fix depends on where the integration test is failing.
Some failures occur because the application never reaches an idle state, while others stem from the Android test automation, inconsistent application state, or environment-specific timing issues.
Start by identifying the point at which the test stops, then work through the fixes below in order of likelihood.
This approach helps eliminate the most common causes first and avoids masking underlying issues with temporary workarounds such as increasing timeouts.
1. Verify the Application Actually Reaches an Idle State
pumpAndSettle() only succeeds when Flutter detects no pending frames. If an animation, loading indicator, polling service, or stream continuously schedules frames, the method eventually times out.
Instead of waiting indefinitely, wait for a specific UI element that confirms the application reached the expected state.
await tester.tap(find.text('Login'));

await tester.pump();

expect(find.text('Dashboard'), findsOneWidget);
2. Check Android Integration Test Configuration
Incorrect Android test configuration can prevent instrumentation from launching even when the Flutter project builds successfully. Verify that the Android test runner and integration test dependencies match your Flutter SDK.
Ensure your Android project includes the proper instrumentation runner.
defaultConfig {
    testInstrumentationRunner
        "androidx.test.runner.AndroidJUnitRunner"
}
Also verify that your integration_test package version is compatible with the installed Flutter SDK.
3. Make Test Data and Device State Predictable
Integration tests should not depend on cached authentication, existing permissions, or previous application state. Android devices used in CI typically start from a clean installation.
Initialize the application into a known state before beginning assertions.
await tester.tap(find.byKey(const Key('loginButton')));

await tester.pump(const Duration(seconds: 2));

expect(find.text('Welcome'), findsOneWidget);
Using deterministic test accounts and seeded backend data reduces intermittent failures.
4. Increase Stability on Slower Android Devices
Android emulators in CI often execute significantly slower than local development machines. Tests that barely pass locally may exceed timeout thresholds under heavier system load.
Allow additional time only where necessary instead of increasing global timeouts.
await tester.pumpAndSettle(
  const Duration(seconds: 60),
);
If failures only occur in CI, monitor emulator CPU usage and startup time before increasing timeout values.
How AI Can Help You Fix Flutter Integration Test Failing on Android Faster
Debugging these failures typically involves reviewing Android Logcat output, Flutter test logs, Gradle reports, screenshots, and repeated test executions while adjusting waits, synchronization points, and application state.
Much of the engineering time is spent isolating where execution stopped rather than fixing the underlying defect.
An AI-assisted QA layer can inspect the test code before execution for patterns commonly associated with Android integration test failures.
It can identify indefinite pumpAndSettle() calls, unstable widget finders, missing synchronization, environment assumptions, or Android configuration inconsistencies before the test reaches a device.
Flutter’s integration test framework tells you where execution failed after the test runs. A code review layer can identify synchronization risks, unstable waits, and environment assumptions before the Android test is executed.
That is where Panto AI fits.
While Flutter surfaces the failure at runtime, Panto AI’s mobile QA and code review layer can flag the synchronization issues, unstable waiting patterns, and Android test configuration problems earlier in the workflow and directly in the pull request.
The value is not in replacing Flutter. The value is in catching synchronization defects before they become flaky test failures, repeated CI reruns, and delayed releases.
Best Practices To Prevent Flutter Integration Test Failing on Android
Most Flutter integration test failures on Android are preventable with consistent test design and a stable execution environment.
Rather than increasing timeouts or rerunning flaky tests, focus on practices that improve synchronization, isolate test state, and reduce platform-specific variability.
These approaches help keep integration tests reliable across local machines, emulators, physical devices, and CI pipelines.
1. Wait for Application States Instead of Fixed Delays
Avoid relying on arbitrary delays such as Future.delayed() or long pump() durations to synchronize your tests.
Instead, wait for a specific widget, screen, or application state that confirms the previous action has completed before moving to the next step.
This approach makes your tests resilient to differences in device performance and network latency.
Whether the test runs on a fast local emulator or a slower CI device, waiting for observable application behavior produces far more reliable results than guessing how long an operation might take.
2. Keep Background Tasks Predictable During Testing
Background animations, periodic timers, polling services, and continuously updating streams can prevent Flutter from reaching an idle state.
As a result, methods such as pumpAndSettle() may continue waiting until they eventually time out.
Where possible, disable non-essential background activity during integration testing or replace it with mocked implementations.
Keeping background work predictable reduces unnecessary frame scheduling and allows tests to complete consistently across different Android devices.
3. Use Stable Widget Identifiers for Element Selection
Build your tests around stable widget identifiers, such as Key values, rather than visible text, widget hierarchy, or layout position.
User-facing labels can change because of localization, UI redesigns, or copy updates, while stable identifiers remain consistent.
Using reliable selectors makes tests easier to maintain and significantly reduces failures caused by unrelated interface changes.
It also makes debugging faster because each interaction targets a clearly defined widget.
4. Start Every Test with a Clean and Predictable State
Each integration test should initialize the application from a known state instead of relying on cached logins, stored preferences, existing permissions, or data created by previous tests.
Hidden dependencies between tests are a common source of failures that are difficult to reproduce consistently.
Resetting the application state before every execution ensures that each test validates only the scenario it is intended to cover.
This improves reproducibility across local development, Android emulators, physical devices, and clean CI environments.
5. Keep Flutter and Android Testing Dependencies in Sync
Regularly verify that the Flutter SDK, integration_test package, Android Gradle Plugin, Gradle version, and AndroidX testing libraries are compatible with one another.
Integration test failures frequently appear after framework upgrades when one or more dependencies remain on older versions.
Review dependency compatibility whenever upgrading Flutter or adding new plugins.
Keeping the Android testing stack aligned minimizes platform-specific issues and reduces failures caused by configuration mismatches rather than application behavior.
Handling Flutter Integration Test Failing on Android In CI/CD Pipelines
CI environments are generally slower than local machines and often execute Android emulators without hardware acceleration.
This increases startup time, rendering delays, and synchronization failures that may never appear during local development.
Parallel test execution can also introduce resource contention. Multiple Android emulators competing for CPU and memory frequently increase widget rendering times, leading to intermittent timeout failures.
Before executing integration tests, verify that the emulator is fully booted.
adb wait-for-device

until adb shell getprop sys.boot_completed | grep -m 1 "1"; do
  sleep 2
done

flutter test integration_test
Waiting for Android to complete booting before starting the test significantly reduces environment related failures in CI.
For a more detailed fix on Flutter test’s failing in the pipeline, click here →
Conclusion
Flutter integration test failures on Android are execution time failures that typically point to synchronization issues, Android configuration problems, or inconsistent application state rather than application logic defects.
The fastest debugging approach is to identify where execution stopped, verify Android instrumentation, inspect widget synchronization, confirm predictable application state, and reproduce the issue on a clean device before modifying timeout values.
For teams running large mobile test suites, the objective is not simply fixing an individual failure. It is removing unstable testing patterns so integration tests remain reliable across local development, CI pipelines, and production release cycles.
Panto QA helps identify synchronization issues, unstable waiting patterns, and Android test configuration problems before they turn into failing Flutter integration tests.
FAQs
Q: Why do Flutter integration tests fail only on Android?
A: Android devices and emulators have different lifecycle behavior, permissions, rendering performance, and platform APIs than iOS or Flutter’s test environment. Issues with plugins, asynchronous operations, emulator performance, or Android-specific configuration often surface only during Android integration testing.
Q: Why do Flutter integration tests fail in CI but pass locally?
A: CI environments typically run on slower hardware with limited CPU and memory, making Android emulators slower to start and increasing synchronization delays. Fresh environments also expose hidden dependencies on cached data, local configuration, or previous test runs that aren’t present in CI.
Q: How is an integration test failure different from a Flutter widget test failure?
A: Widget tests run inside Flutter’s testing framework without launching a full application, making them fast and isolated. Integration tests run against the complete Android app on a real device or emulator, so they can fail because of platform behavior, instrumentation, device performance, or system configuration.
Q: Should I increase timeout values to fix Flutter integration test failures?
A: Only if slower devices genuinely require more time. In most cases, repeated timeout failures indicate synchronization issues, unfinished asynchronous work, or application logic problems. Fixing the underlying cause produces more stable tests than simply extending timeout values.